Explore unique crochet patterns and free designs from a passionate freelance designer @ Angel's Crochet Studio

Here you will find the FREE pattern! If you want, you can also get the complete PDF for a small fee:
Thank you for choosing this pattern and supporting my work!
I would love to see any photos you take of your work.
Feel free to use #AngelsCrochetStudio and #PouchMeIfYouCan and tag me @angelscrochetstudio on Instagram.
If you have any questions, please get in touch at angelscrochetstudio@gmail.com and I’ll get back to you as soon as possible!
At the end of this file, you will find more pics and a printable version!

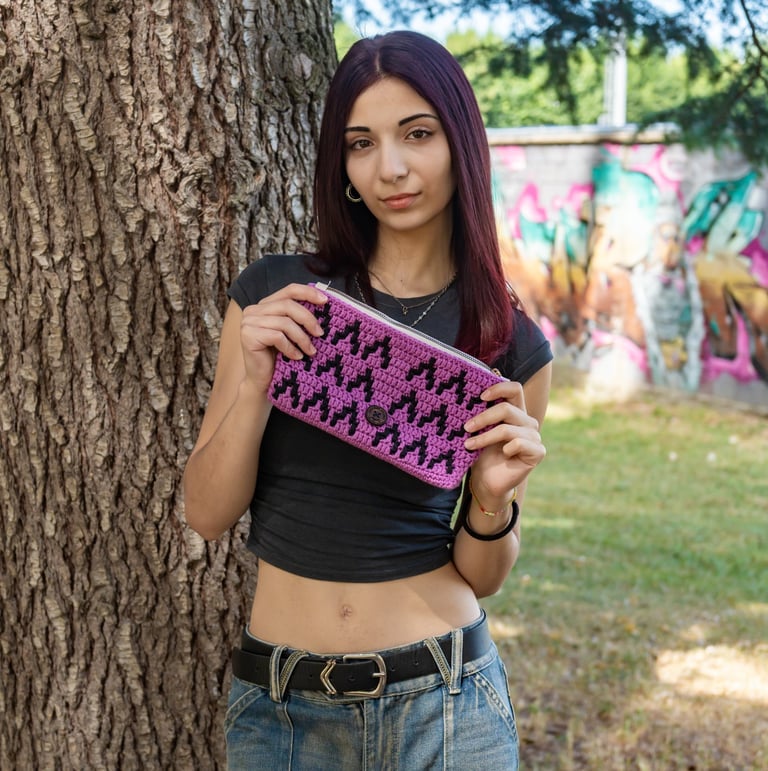

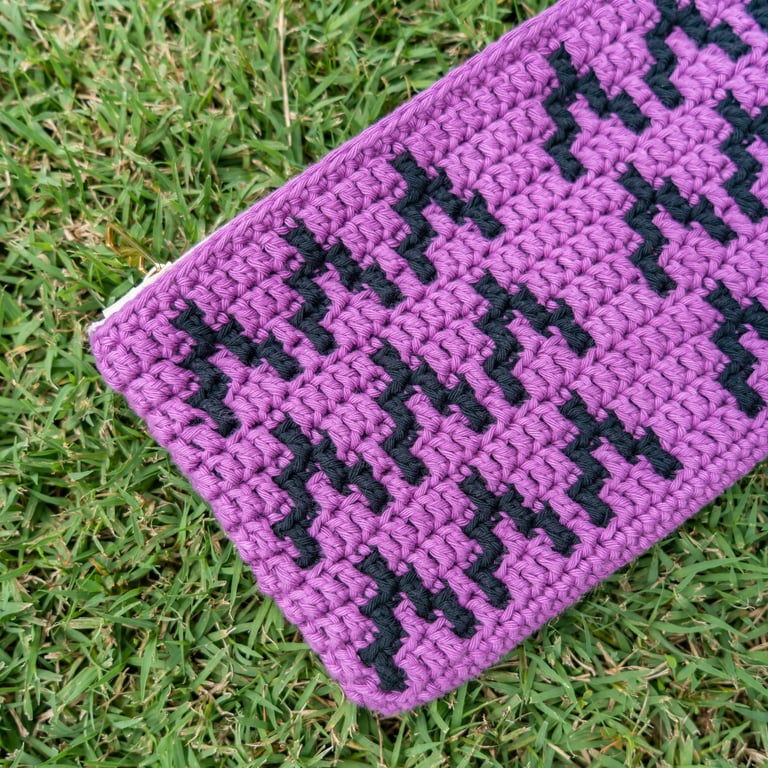
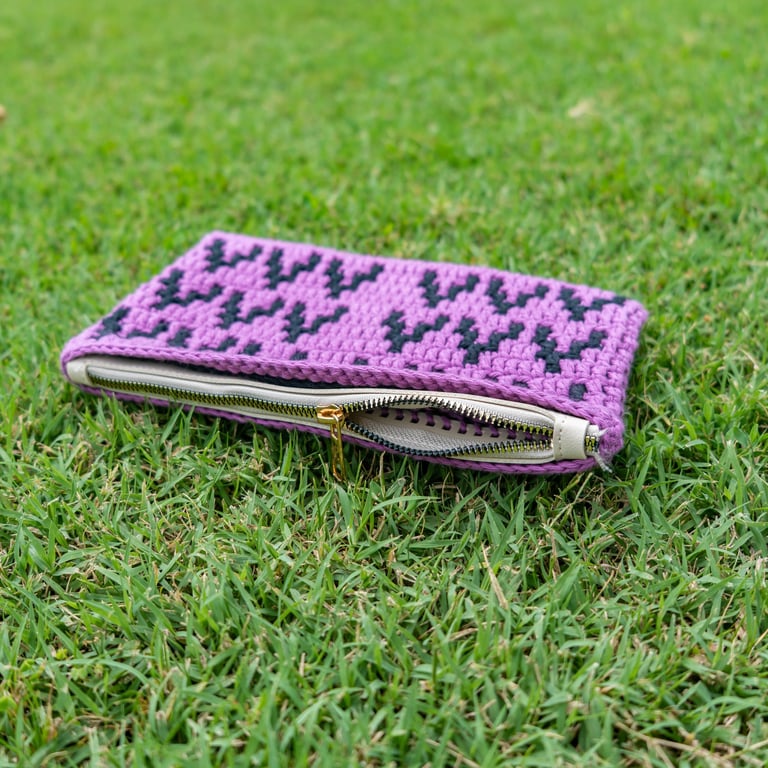
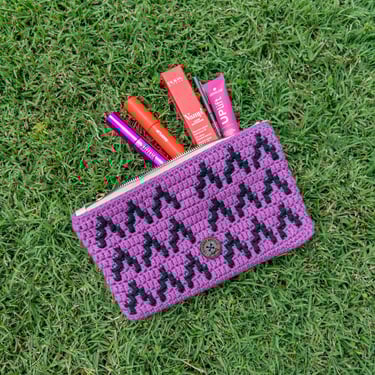
A Crochet Pattern For A Pouch Made With Overlay Mosaic Crochet Technique
Pouch Me If You Can is your go-anywhere, grab-and-go crochet pouch that shines with the same overlay mosaic magic you love—
only in a compact, zipper-topped package.
You’ll work it bottom-up in joined rounds, alternating two colors on the right side only, so every stripe and drop-down stitch pops against its partner.
Chain-1 at the start of each round never counts as a stitch; instead, you follow a simple chart where blank squares are single crochets in the back loop
and “X” squares are drop-down double crochets reaching two rounds below through the front loop.
Finished dimensions hover around 24 cm wide by 15 cm tall
(or 10 cm if you invert colors for a shorter look as in the 2nd example), achieved by repeating a 21-stitch motif twice around each panel.
Want it skinnier? Trim a repeat; need it taller? Just add or subtract repeats of rounds 2–9 until it feels just right.
I stitched mine with four repeats per round—two for the front and two for the back—
and even created a handy printable chart to keep track.
Once your mosaic body is done, grab a zipper—ideally one with side holes for easy sewing—
and stitch it to both sides of the top opening.
Don’t forget a stitch marker at the last stitch of each front and back so you never lose your place.
And here’s a pro move for clean edges: when a round starts and ends with a double crochet, insert your hook twice,
first into the last stitch then into that first stitch before yarning over on the last one.
It locks everything in and keeps your sides beautifully even.
Ready to pouch up your essentials in vibrant mosaic style?
Grab your hook, pick your favorite two hues, and let’s stitch a small but mighty accessory that’s sure to turn heads!


DIFFICULTY LEVEL
This is an easy crochet pattern.
GAUGE
15SC x 18ROWS = 10 x 10CM
YARN & HOOKS
HOOK 4 mm
Hobbii Friends Cotton 8/8 (100% cotton, 50 g (1.75 oz) ca. 75 m (82 yds)
C1 Thistle 61 (1,5 x 50gr/75mt skeins)
C2 Black 124 (1 x 50gr/75mt skeins)
25 cm Zipper
Tapestry needle & Scissors (to weave and hide yarn ends)
(for smaller version with inverted colors)
HOOK 4 mm
Hobbii Friends Cotton 8/8 (100% cotton, 50 g (1.75 oz) ca. 75 m (82 yds)
C1 Black 124 (1 x 50gr/75mt skeins)
C2 Thistle 61 (1 x 50gr/75mt skeins)
25 cm Zipper
Tapestry needle & Scissors (to weave and hide yarn ends)
The pattern is in US terms

CROCHET TERMS
BLO - Back Loop Only
BLSC - Back Loop Only SC
CH - Chain
DC - Double Crochet
FC - Foundation Cord
FLDC - Front Loop Only DC
FO - Fasten off
RS - Right Side
SC - Single Crochet
SS - Slip ST
ST - Stitch
WS - Wrong Side
YO - yarn over


© 2024. Angel's Crochet Studio: All rights reserved.